
kakao developers
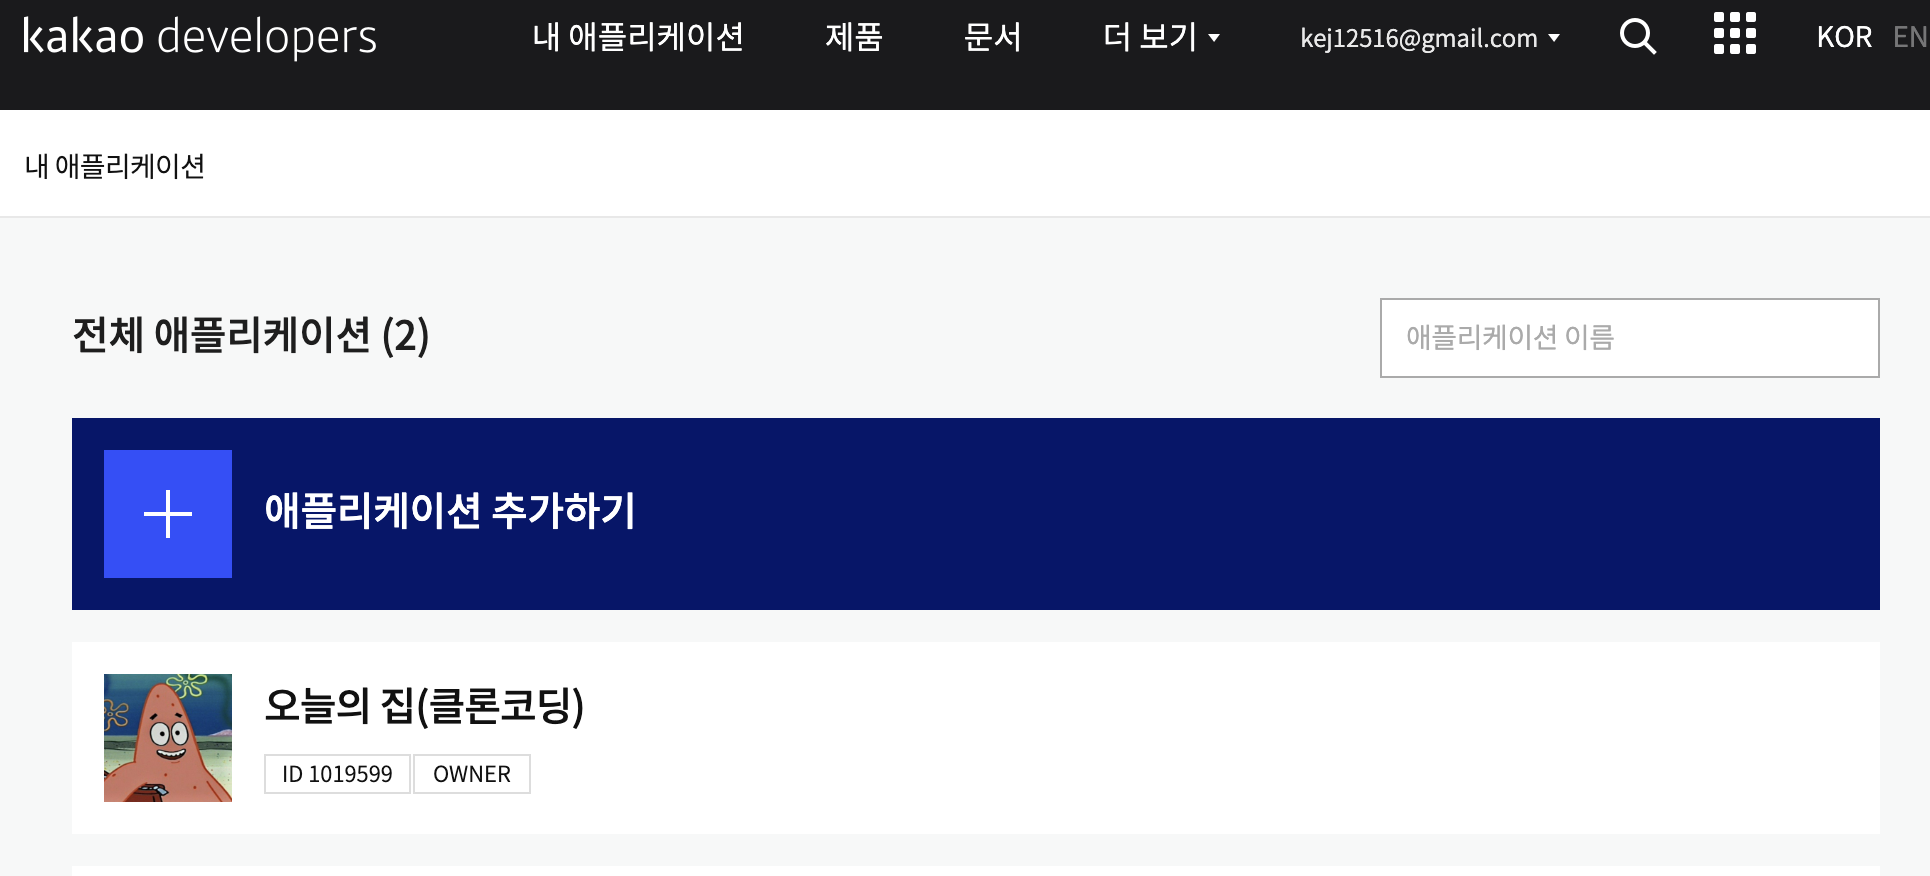
카카오 로그인을 구현하려면 우선 카카오 개발자 계정이 있어야한다. 계정이 있으면 애플리케이션 추가하기를 눌러서 아래와 같이 추가하자.
생성하고 나서 왼쪽 메뉴 중에 카카오 로그인 -> 동의항목을 누르면 아래와 같이 나온다.
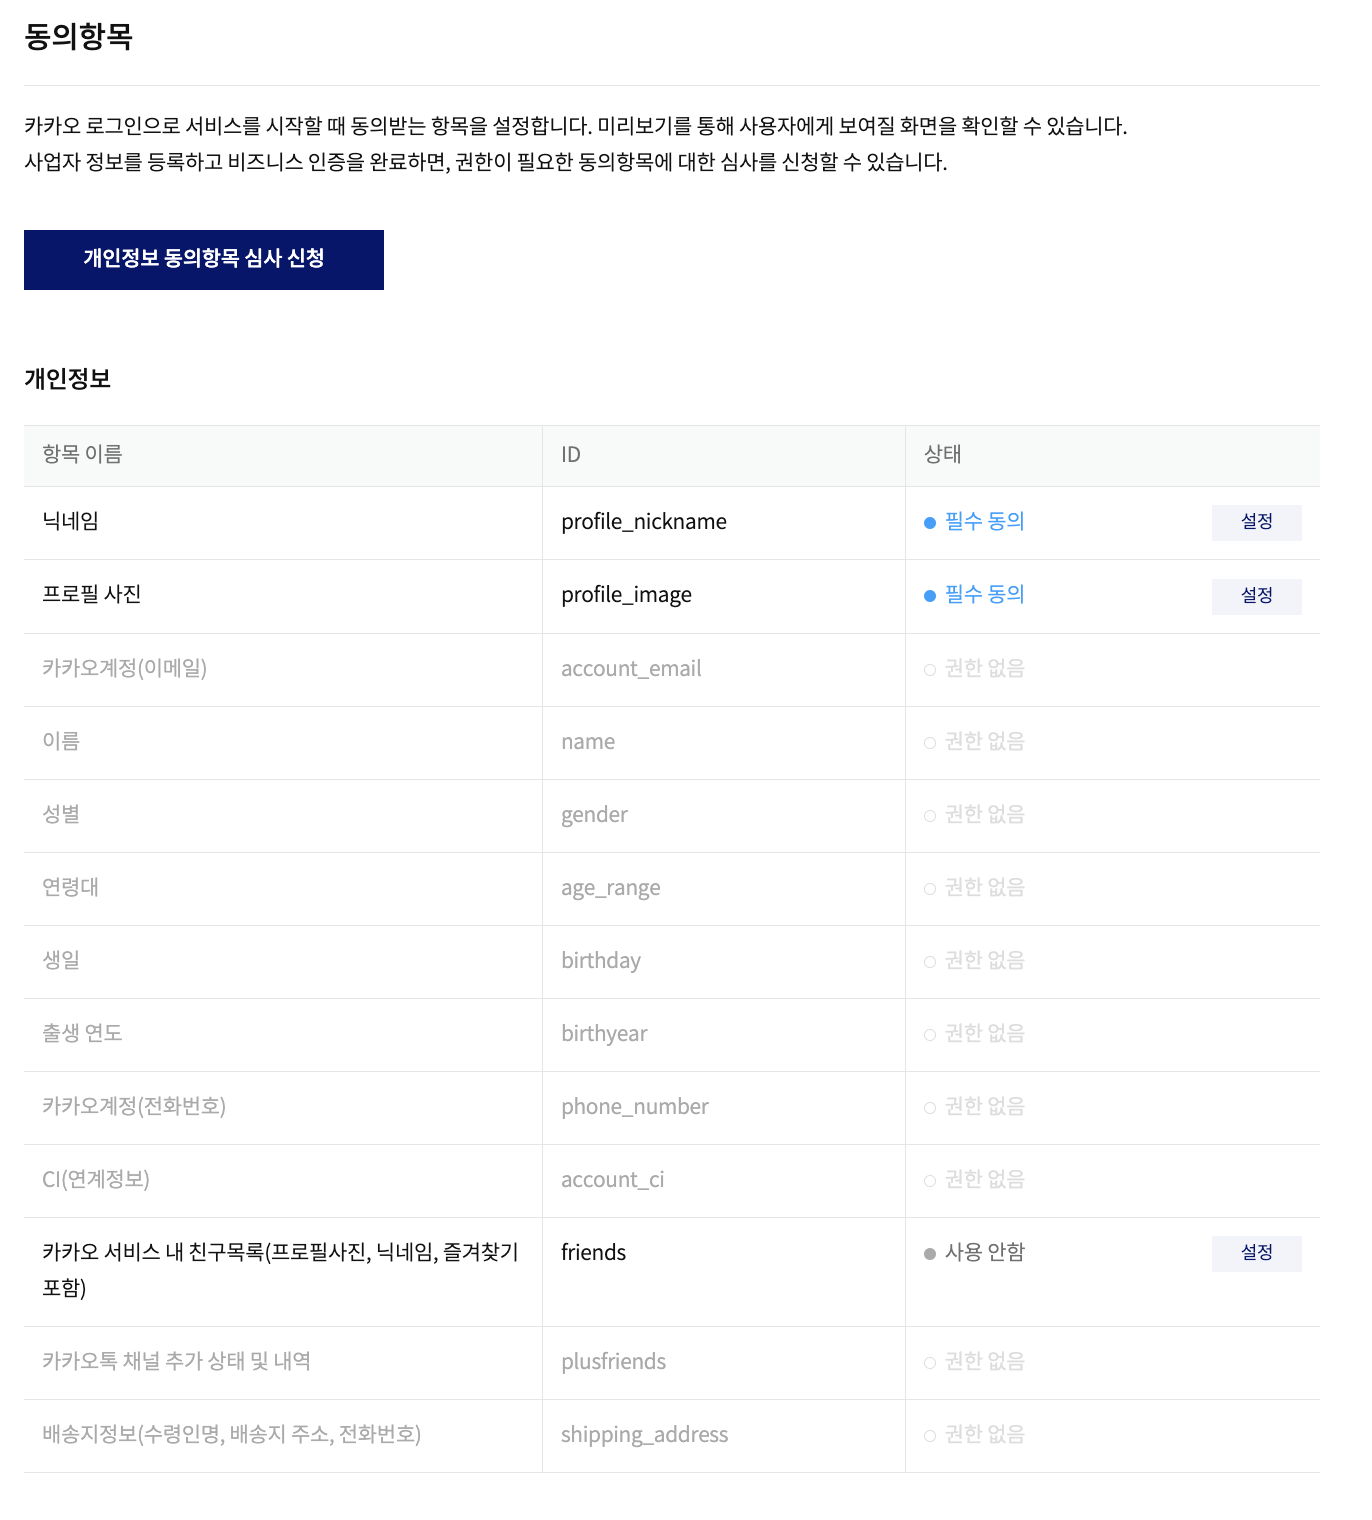
기본적으로 설정할 수 있는 건 위 이미지와 같다. 필수적으로 받아야 할 부분이 있다면 설정을 눌러서 필수 동의로 체크해주면 된다. 참고로 개인정보(이름, 성별, 생년월일 등)을 수집하려면 동의항목을 추가하려면 심사 신청을 해야 받을 수 있다.
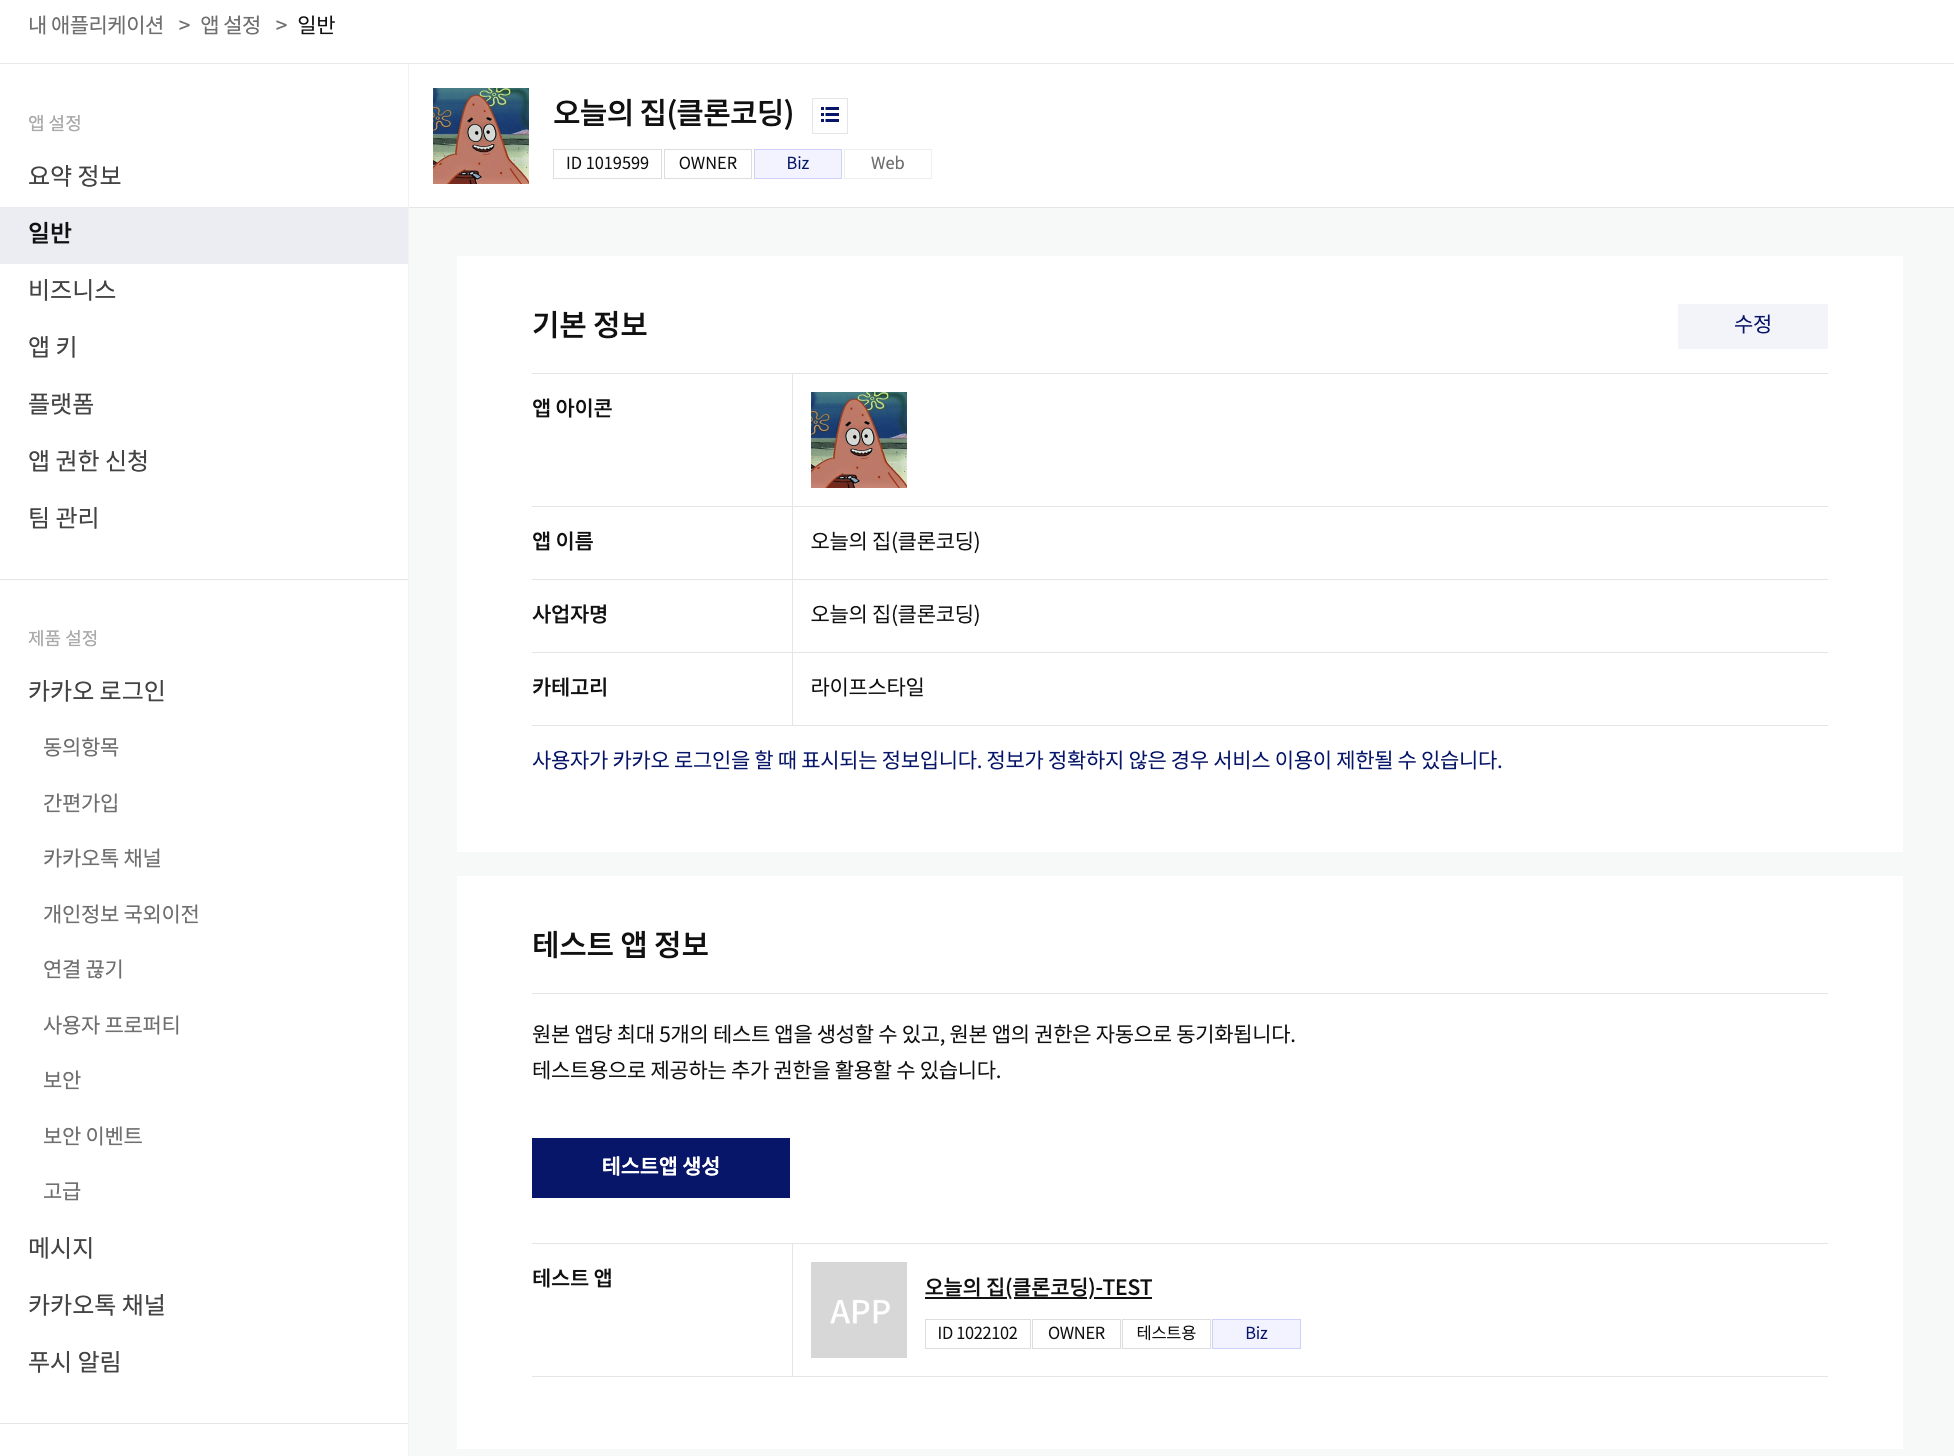
또한 원본 앱에 개발용으로 테스트할 수 있게 만들 테스트 앱을 생성해야 된다. 테스트 앱을 생성하게 되면 API키가 원본 키와 테스트 앱 키, 총 2개가 나온다. prod는 원본 키를 쓰고, 개발을 위한 테스트는 테스트 앱키를 사용한다.
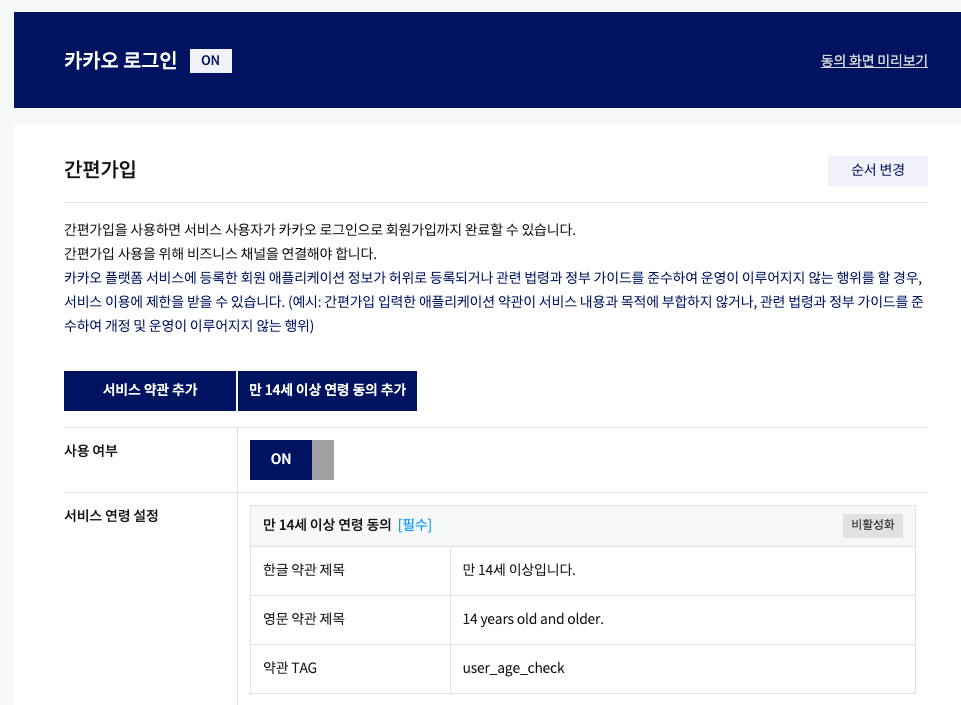
카카오 간편 로그인 항목에 보면 ‘만 14세 이상 연령 동의’에 관한 항목을 추가할 수 있다. 오늘의 집 회원가입 이용약관을 살펴보면 만 14세 미만의 경우 가입할 수 없기 때문에 해당 항목을 추가했다. 약관에 대해서는 추가할 부분이 더 있지만, 해당 부분은 일단 패스하도록 한다.
구현 방식
카카오 로그인에 대해 찾아보면 다양한 방식의 구현 방법이 나온다.
나는 따로 프론트를 구축하지는 않았고, 벡엔드에만 집중하기 위해서 그냥 HTML로 간단하게 구현했다. 참고로 REST API를 호출해서 구현할 예정이다.
Kakao Login (HTML)
아래는 HTML로 구현한 간단한 로그인 폼이다. 카카오 개발자 게정에 들어가면 client Id와 redirect uri이 있으니, 가져와서 넣어주자.
<!-- kakao.html -->
<!DOCTYPE html>
<html lang="en">
  <head>
    <meta charset="UTF-8" />
    <title>Kakao Login</title>
  </head>
  <body>
    <a
      href="https://kauth.kakao.com/oauth/authorize?response_type=code&client_id={cliendt-Id}&redirect_uri=http://localhost:8080/oAuth.html"
    >
      Kakao 로그인
    </a>
  </body>
</html>
그리고 redirect uri로 쓰일 html을 아래와 같이 구현했다.
<!-- oAuth.html -->
<!DOCTYPE html>
<html lang="en">
  <head>
    <meta charset="UTF-8" />
    <title>Kakao Login</title>
  </head>
  <body>
    <!-- 로그인 성공 시 보여줄 페이지 -->
    <div id="login-success" style="display:none;">
      <h1>로그인 성공</h1>
      <p>환영합니다!</p>
    </div>
    <script>
      // URL에서 'code' 쿼리 파라미터를 찾는 함수
      function getQueryParam(param) {
        var search = window.location.search.substring(1);
        var variables = search.split("&");
        for (var i = 0; i < variables.length; i++) {
          var pair = variables[i].split("=");
          if (pair[0] == param) {
            return pair[1];
          }
        }
        return false;
      }

      // 페이지 로드 시 'code' 파라미터를 확인하고 로그인 성공 메시지 표시
      window.onload = function () {
        var code = getQueryParam("code");

        fetch("http://localhost:8080/oauth/login/kakao/" + code)
          .then((response) => response.json())
          .then((data) => console.log(data))
          .catch((error) => console.error("Error:", error));
        if (code) {
          document.getElementById("login-success").style.display = "block";
        }
      };
    </script>
  </body>
</html>
application.yml
application.yml을 아래와 같이 설정하자. 카카오 계발자 계정에 다 있으니까 알맞게 넣으면 되고, 나는 프로필 이미지, 닉네임, 이메일만 필요해서 이 3개의 값을 받는걸로 만들려고 한다.
security:
  oauth2:
    client:
    registration:
      kakao:
      client-id: ${KAKAO_CLIENT_ID}
      client-secret: ${KAKAO_CLIENT_SECRET}
      redirect-uri: http://localhost:8080/oauth2/callback/kakao
      authorization-grant-type: authorization_code
      client-authentication-method: POST
      client-name: Kakao
      scope:
        - profile_image
        - profile_nickname
        - account_email
    provider:
      kakao:
      authorization-uri: https://kauth.kakao.com/oauth/authorize
      token-uri: https://kauth.kakao.com/oauth/token
      user-info-uri: https://kapi.kakao.com/v2/user/me
      user-name-attribute: id
카카오 로그인 과정
대부분의 소셜 로그인의 과정은 아래의 시퀀스 다이어그램을 크게 벗어지나 않는다. 그러니 아래의 그림을 계속 봐두면서 눈에 익혀두면 좋을 것 같다.

인가 코드 받기
시퀀스 다이어그램에도 있듯이 첫번째 인가 코드를 구현하자.
public enum OauthServerType {
    KAKAO("카카오");
    private final String description;

    OauthServerType(String description) {
        this.description = description;
    }
    public String getDescription(){
        return description;
    }

    public static OauthServerType fromName(String type) {
        return OauthServerType.valueOf(type.toUpperCase(Locale.ENGLISH));
    }
}
나중에 네이버와 페이스북 로그인도 추가해야되기 때문에, enum을 사용해서 Oauth Type을 정의했다. 그리고 아래와 같이 인터페이스 하나를 추가했는데, 카카오 로그인을 처리할때 OauthServerType.KAKAO 을 반환하고, provide()를 통해 URL을 생성하고, 해당 주소로 Redirect한다.
public interface AuthCodeRequestUrlProvider {
    OauthServerType supportServer();
    String provide();
}
카카오 로그인(REST API) 문서를 보면 아래와 같은 주소를 호출하면 인가 코드를 받을 수 있다고 한다.
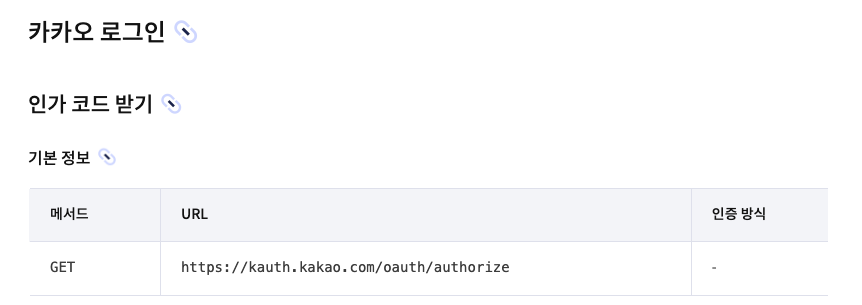
해당 API를 호출하기 위해 아래와 같이 코드를 작성하였다.
@Component
@RequiredArgsConstructor
public class KakaoAuthCodeRequestUrlProvider implements AuthCodeRequestUrlProvider {

    private final KakaoOauthConfig kakaoOauthConfig;

    @Override
    public OauthServerType supportServer() {
        return OauthServerType.KAKAO;
    }

    @Override
    public String provide() {
        return UriComponentsBuilder
                .fromUriString("https://kauth.kakao.com/oauth/authorize")
                .queryParam("response_type", "code")
                .queryParam("client_id", kakaoOauthConfig.clientId())
                .queryParam("redirect_uri", kakaoOauthConfig.redirectUri())
                .queryParam("scope", String.join(",", kakaoOauthConfig.scope()))
                .toUriString();
    }
}
아래는 OAuth 서비스 제공자별로 인증 코드 요청 URL을 제공하는 코드이다.
@Component
public class AuthCodeRequestUrlProviderComposite {
    private final Map<OauthServerType, AuthCodeRequestUrlProvider> mapping;

    public AuthCodeRequestUrlProviderComposite(Set<AuthCodeRequestUrlProvider> providers) {
        mapping = providers.stream()
                .collect(toMap(
                        AuthCodeRequestUrlProvider::supportServer,
                        identity()
                ));
    }

    public String provide(OauthServerType oauthServerType) {
        return getProvider(oauthServerType).provide();
    }

    private AuthCodeRequestUrlProvider getProvider(OauthServerType oauthServerType) {
        return Optional.ofNullable(mapping.get(oauthServerType))
                .orElseThrow(() -> new RuntimeException("지원하지 않는 소셜 로그인 타입입니다."));
    }
}
이제 컨트롤러를 아래와 같이 만들면 인가요청 하는 부분은 끝난다.
@RequestMapping("/api/v1/oauth")
@RestController
public class OauthController {
    private final OauthService oauthService;

    public OauthController(OauthService oauthService) {
        this.oauthService = oauthService;
    }

    @GetMapping("/{oauthServerType}")
    public DataResponse<String> redirectAuthCodeRequestUrl(
            @PathVariable("oauthServerType") OauthServerType oauthServerType, HttpServletResponse response
    ) throws IOException {
        String redirectUrl = oauthService.getAuthCodeRequestUrl(oauthServerType);
        response.sendRedirect(redirectUrl);
        return new DataResponse<>(KakaoOauthResponseCode.OAUTH_AUTHORIZE_SUCCESS, "ok");
    }
}
화면을 보면 아래와 같이 HTML로 만든 버튼이 보이고,
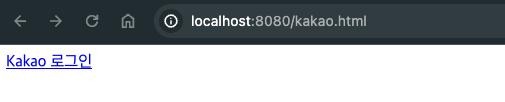
누르면 카카오 로그인창이 뜬다.
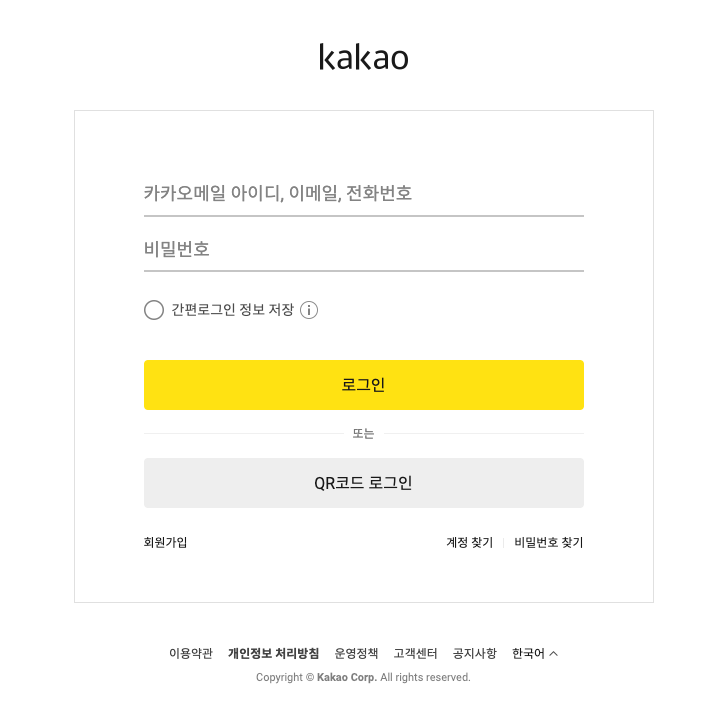
그리고 로그인을 하기를 누르게 되면 아까 설정한 동의 항목이 보인다.
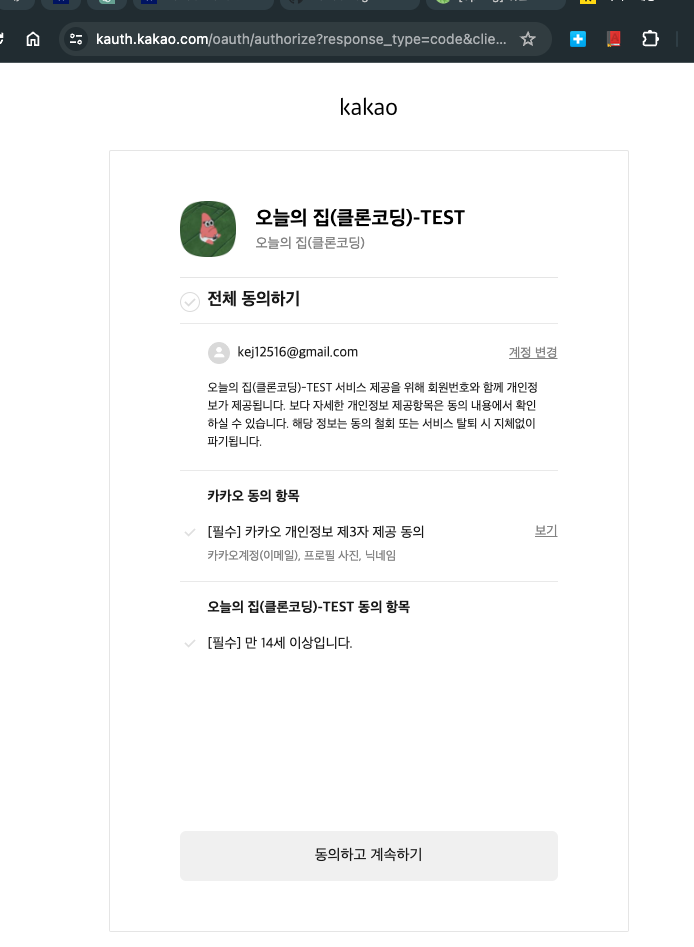
이제 여기서 동의하기를 누르고 Redirect URI로 인가코드를 전달하면 이제 거의 다 끝났다고 봐도 된다.
토큰 받기 & 로그인
아래는 Access Token을 가져오기 위한 URL을 넣은 코드이다. 첫번쨰 주소는 토큰을 가져오는 거고, 두번째 주소는 받은 토큰을 이용해 해당 유저의 정보를 받아오는 주소다.
public interface KakaoApiClient {
    @PostExchange(url = "https://kauth.kakao.com/oauth/token", contentType = APPLICATION_FORM_URLENCODED_VALUE)
    KakaoToken fetchToken(@RequestParam MultiValueMap<String, String> params);
    @GetExchange("https://kapi.kakao.com/v2/user/me")
    KakaoMemberResponse fetchMember(@RequestHeader(name = AUTHORIZATION) String bearerToken);
}
우선 토큰을 받기 위한 DTO를 아래와 같이 작성했다.
@Getter
public class KakaoToken {

    @SerializedName("token_type")
    String tokenType;

    @SerializedName("access_token")
    String accessToken;

    @SerializedName("id_token")
    String idToken;

    @SerializedName("expires_in")
    Integer expiresIn;

    @SerializedName("refresh_token")
    String refreshToken;

    @SerializedName("refresh_token_expires_in")
    Integer refreshTokenExpiresIn;
    String scope;
}
그리고 UserRepository는 아래와 같이 작성했다.
public interface UserRepository extends CrudRepository<User, Long> {

    List<User> findAllByIdIn(Collection<Long> userIds);

    Optional<User> findByProviderKey(String providerKey);
}
아래는 서비스 부분이고, 로그인을 진행하는 과정에 가입하지 않은 유저라면 회원가입을 시키고, 가입되어 있다면, 그냥 로그인할 수 있도록 해뒀다.
@Service
public class OauthService {
    private final AuthCodeRequestUrlProviderComposite authCodeRequestUrlProviderComposite;
    private final OauthMemberClientComposite oauthMemberClientComposite;
    private final UserService userService;

    public OauthService(AuthCodeRequestUrlProviderComposite authCodeRequestUrlProviderComposite, OauthMemberClientComposite oauthMemberClientComposite, UserService userService) {
        this.authCodeRequestUrlProviderComposite = authCodeRequestUrlProviderComposite;
        this.oauthMemberClientComposite = oauthMemberClientComposite;
        this.userService = userService;
    }

    public String getAuthCodeRequestUrl(OauthServerType oauthServerType) {
        return authCodeRequestUrlProviderComposite.provide(oauthServerType);
    }

    public User login(OauthServerType oauthServerType, String authCode) {
        User user = oauthMemberClientComposite.fetch(oauthServerType, authCode);
        return userService.saveUser(user);
    }
}
최종적인 컨트롤러는 아래와 같다.
@RequestMapping("/api/v1/oauth")
@RestController
public class OauthController {
    private final OauthService oauthService;

    public OauthController(OauthService oauthService) {
        this.oauthService = oauthService;
    }

    @GetMapping("/{oauthServerType}")
    public DataResponse<String> redirectAuthCodeRequestUrl(
            @PathVariable("oauthServerType") OauthServerType oauthServerType, HttpServletResponse response
    ) throws IOException {
        String redirectUrl = oauthService.getAuthCodeRequestUrl(oauthServerType);
        response.sendRedirect(redirectUrl);
        return new DataResponse<>(KakaoOauthResponseCode.OAUTH_AUTHORIZE_SUCCESS, "ok");
    }

    @GetMapping("/login/{oauthServerType}/{code}")
    public DataResponse<String> login(
            @PathVariable("oauthServerType") OauthServerType oauthServerType,
            @PathVariable("code") String code
    ) {
        return new DataResponse<>(KakaoOauthResponseCode.LOGIN_SUCCESS,"ok");
    }
}
그리고 실행하면 아래와 같이 로그인이 된 모습을 볼 수 있다.
